1. Sage green cabinet doors with white shaker trim
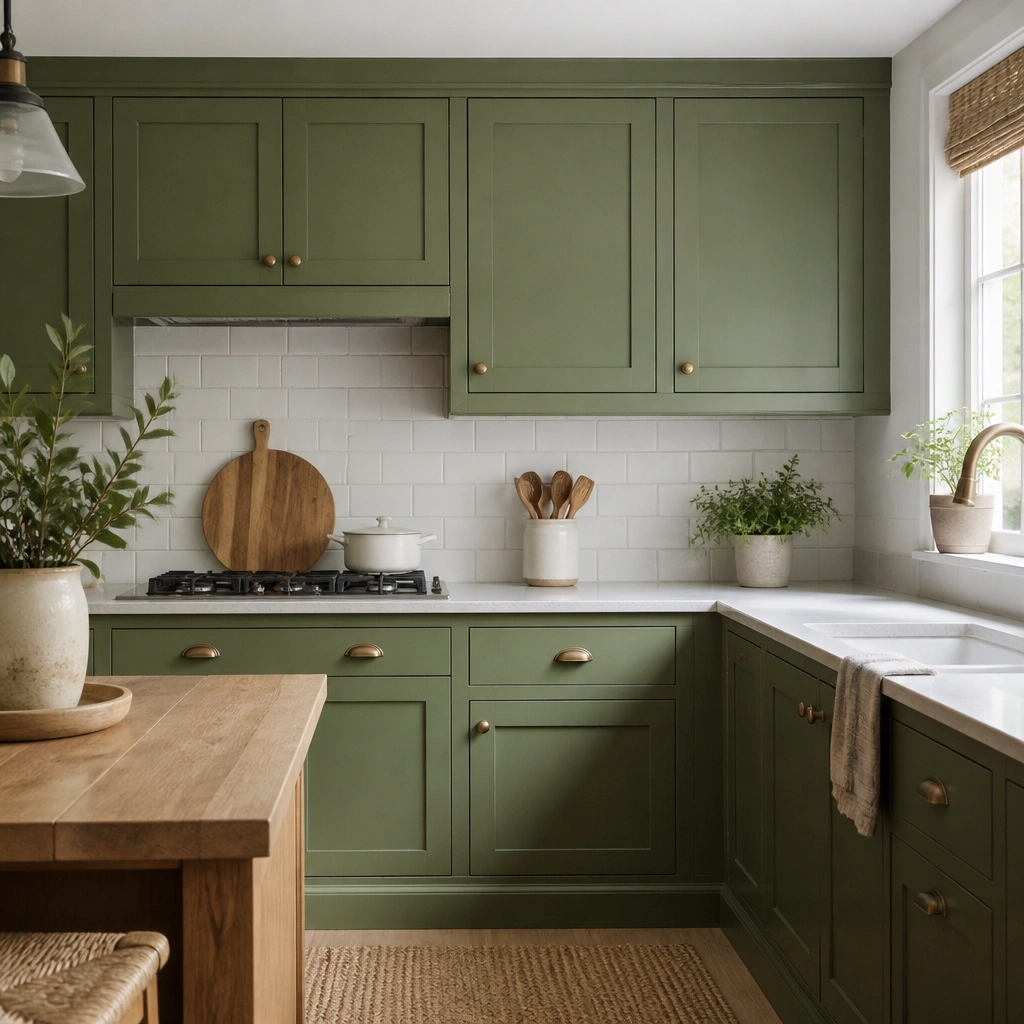
Go sage if you want green kitchen cabinets to read soft, not loud. Keep the door panels sage and leave the shaker trim white so the lines stay crisp from across the room. Sage also forgives small surface imperfections because it’s light and low-contrast. Pair it with a white or off-white laminate countertop and matte black pulls for a clean, modern read that doesn’t feel budget. This works best in smaller kitchens or bedroom kitchenette corners where dark cabinets can make the space feel tighter.
Start by sanding cabinet doors lightly (150-220 grit) and cleaning with degreaser so paint and vinyl stick. Prime with a bonding primer made for laminate or previously painted surfaces, then paint sage in two thin coats using a foam roller for the flat areas and a small angled brush for edges. Install matte black bar pulls centered about 2.75-3.25 inches from the door’s vertical midpoint. Expect paint and primer to run about $60-120 if you already have basic supplies; the hardware is usually $20-60 for a small run.
Use a satin finish for sage so it reflects light smoothly without looking glossy.
Don’t mix a sage door with a warm yellow trim — it makes the green look muddy.
2. Olive green cabinets with warm oak laminate countertops
Olive green is the “budget grown-up” choice because it reads earthy with almost any wood tone. Choose a warm oak-look laminate (with visible grain) to keep the whole setup from feeling cold. Olive hides minor scuffs better than mint and looks good with brass hardware, which adds warmth without needing real wood furniture. In a bedroom, this combo looks great on a dresser-cabinet wall where you want calm, not candy color. The goal is a grounded palette: olive + warm wood + one metal finish.
Paint or apply vinyl to the cabinet doors in olive, then choose a warm oak laminate for the countertop or dresser top. If painting, prime first, then use a satin olive paint and apply two coats; allow full dry time between coats. If you’re laminating, measure the surface carefully and cut using a straightedge and sharp utility blade; use contact adhesive or a laminate kit. Hardware: aged brass knobs or cup pulls cost about $25-70 depending on size. Plan on $80-200 for paint/vinyl and $40-150 for laminate depending on coverage.
Match the undertone: pick olive that leans slightly yellow-green, not gray-green.
Skip cool gray countertops with olive — it makes the cabinets look sickly.
3. Deep forest green with white quartz-look contact paper
Forest green looks expensive when you pair it with a bright, clean countertop surface. Use a white quartz-look contact paper if you’re on a hard budget; it’s not “perfect,” but it reads sharp from the doorway. Deep green plus white gives you the high contrast that makes doors look tailored. Add gold-tone knobs or pulls to keep the palette warm and prevent the green from looking harsh. This is a strong choice for a bedroom kitchenette corner where you want a dramatic focal wall without remodeling.
Clean and de-grease doors, then apply forest green paint or vinyl. For paint, prime thoroughly, then roll with a foam roller and brush the edges; two coats are usually enough. For contact paper, cut the countertop pieces 1/8 inch larger, then squeegee and trim once it’s adhered; overlap seams away from the most visible spots. Install gold-tone pulls centered on the door rails and aligned across the run for a straight visual line. Budget: paint/vinyl $70-180, contact paper $25-60, hardware $25-80.
Pro tipSeal contact paper edges with clear shelf liner adhesive so corners don’t lift.
One warningDon’t choose a yellow-white countertop print; it clashes with forest green undertones.
4. Mint green cabinets with black and white check tile backsplash
Mint green reads fresh and playful, but it looks “designed” when you anchor it with pattern and contrast. A black and white check backsplash does that instantly and cheaply, especially if you’re using peel-and-stick tile. Mint also works well in small rooms because it stays light and doesn’t swallow shadows. This setup is great for a bedroom wet bar area or a compact kitchen corner where you want character without changing the whole layout. Keep the rest of the palette minimal: white walls and black hardware.
Paint the cabinet doors mint in a satin finish after priming; two coats usually cover well. Add black hardware like flat bar pulls or simple knobs; center pulls roughly 3 inches from the bottom of drawer fronts. For the backsplash, measure the space and install peel-and-stick check tile starting at the centerline, pressing firmly and trimming edges with a sharp blade. Budget: paint $60-130, peel-and-stick tile $30-90, hardware $20-70.
Pro tipUse a matte wall paint near the backsplash so the mint doesn’t compete with shine.
One warningDon’t pair mint with warm brass and cream walls — it trends dated fast.
5. Two-tone green uppers and darker green lowers
Two-tone green creates depth without expensive cabinet changes. Keep the uppers a lighter green (sage or mint) and the lowers a darker green (olive or forest) so the room feels balanced. This is a smart budget move because you can paint only the doors and drawer fronts in two batches. The visual payoff is strong: the cabinets look built for your space, even if you’re working with existing frames. In a bedroom, it works on built-ins where you want the top storage to feel airy and the lower storage to feel grounded.
Pick two green shades from the same brand family if you can, so undertones match. Mask off the door sections and paint uppers first; let them cure enough that tape doesn’t pull the paint. Then paint the lowers with the darker green, again in two thin coats. Install one consistent hardware finish across both zones to avoid “mixed shopping.” Budget: if you’re painting, expect $100-220 for materials depending on how many doors you have.
Pro tipUse the same sheen for both greens so the difference reads as color, not texture.
One warningDon’t switch metal finishes between uppers and lowers — it breaks the intentional look.
6. Green cabinets with shaker door overlay using cheap MDF trim
If your current doors are flat and flimsy-looking, cheap MDF overlay trim can fake a shaker style without replacing cabinets. Paint everything green, then let the overlay lines create shadow gaps that make the doors look custom. This is one of the best budget routes for making green cabinets look “built,” not painted. It works in kitchens and bedroom storage walls because the door pattern reads from a distance. Choose a medium green like olive or soft forest so the overlay shadow lines show up clearly.
Remove doors and drawers if possible, then measure the panel area. Cut MDF trim pieces to create a simple frame and vertical center lines, using a miter saw or sharp hand saw; glue the trim with wood glue and secure with clamps or painter’s tape while it dries. Fill gaps with wood filler, sand smooth, then prime and paint green in two coats. Hardware: basic knobs are $15-40 per set depending on size. Budget: MDF trim and filler $30-90, primer/paint $60-180.
Use painter’s tape to mark a consistent border width so all doors look aligned.
Don’t skip sanding filler smooth — the overlay bumps show through paint.
7. Peel-and-stick green vinyl cabinets with edge sealing
Peel-and-stick vinyl is the fastest way to get budget green kitchen cabinets on a budget, especially for renters. The vinyl can look convincing if the door surfaces are flat and you seal the edges so moisture and grease don’t creep under. Go for a matte or satin green vinyl, not glossy — glossy shows waviness and seam lines. Keep your backsplash and countertops neutral so the vinyl reads as a finished cabinet surface. This works best for bedroom kitchenette corners where you’re not dealing with heavy daily cooking splatter.
Clean doors thoroughly, then degrease and dry completely; any grease causes bubbles. Cut vinyl slightly oversized, apply one edge first, and squeegee slowly with a plastic card to avoid wrinkles. Once the vinyl is on, trim the edges tight with a sharp blade and seal the seams with clear caulk or a thin line of clear adhesive where needed. Install pulls after wrapping so you can drill accurate holes. Budget: vinyl sheets $20-80 depending on coverage, plus $10-25 for seam sealing supplies.
Heat the vinyl with a hair dryer while pressing around corners to keep seams tight.
Don’t wrap over glossy finish without cleaning and scuffing — it lifts.
8. Two coats of paint plus a clear soft-matte topcoat
This is about looking expensive through finish control. Many budget paint jobs fail because the surface is too shiny or too flat and chalky. If you paint green and then add a clear soft-matte topcoat, you get a smooth, even look that hides minor texture. Pick a mid-tone green like sage, olive, or deep green depending on your room light. This is a great option for bedrooms because soft-matte reduces glare in mornings and evenings. It also helps the cabinets wipe clean without looking wet or plastic.
Sand doors lightly and prime with a bonding primer; then paint green in two thin coats. Let it cure, then apply a clear soft-matte topcoat with a foam roller, keeping a light touch so you don’t streak. Work panel by panel and keep your brush strokes consistent so the finish levels. Add hardware after the topcoat is fully dry. Budget: primer/paint $80-200 plus topcoat $20-40.
Pro tipDo a small test door panel and check it under kitchen lighting before you commit to the whole run.
One warningDon’t apply topcoat while paint is still soft — it can wrinkle or trap bubbles.
9. Color-blocked cabinet panels using removable vinyl stripes
If you’re not ready to repaint everything, color-blocked stripes are a budget way to make green cabinets look intentional. Use removable vinyl stripes over a neutral base (white or light wood) to create vertical or horizontal panel lines. Choose one green shade and keep the stripes consistent width so it reads like a design feature, not a sticker job. This works especially well in a bedroom kitchenette corner where you want visual interest without major prep. It also lets you experiment with green undertones before committing to full coverage.
Start by cleaning cabinet doors and applying a base coat like white or light wood-contact paper if needed. Then measure and mark stripe positions using painter’s tape and a level, and apply removable vinyl stripes in straight lines. Press firmly, especially along edges, and keep stripes away from areas that get heavy grease splatter. Finish by installing pulls and aligning them to the stripe grid. Budget: vinyl rolls $15-40 each, base paint or contact paper $20-80.
Use vinyl stripe width that matches your door panel layout — 1 inch stripes look cleaner than random widths.
Don’t place stripes too close to hinges — the door movement will stress the vinyl.
10. Glazed green cabinets using white glaze over painted olive
Glazing makes green cabinets look richer without buying new doors. Paint the cabinets olive first, then apply a light white glaze into grooves and edges so the door details pop. The effect looks like depth and age, but it’s controlled and budget-friendly. Choose a door style with paneling or add simple trim so there are places for glaze to sit. This is great for a bedroom built-in where the cabinets need texture but you don’t want dark, heavy color everywhere.
Paint doors olive in two coats and let them dry fully. Mix a white glaze with water according to the glaze product directions, then apply with a rag or brush, working it into seams and panel edges. Wipe off the excess so only light glaze remains in recesses. Seal with a clear topcoat if the glaze product calls for it. Budget: olive paint $60-140 and glaze product $15-35.
Pro tipUse a damp cloth to control how much glaze stays — less glaze looks more modern.
One warningDon’t glaze glossy paint — it smears and won’t settle into details.
11. Aged green cabinet look with faux rust patina accents
If you like the “old workshop” vibe, you can fake aging with a green base and small patina accents near edges. Start with a muted green like deep olive or moss, then add a thin patina glaze around corners and near hardware. Keep it subtle — the point is to make the green feel lived-in, not to turn your cabinets into a science project. This works well in bedrooms where you want character in a storage wall or vanity. It also pairs nicely with matte black hardware.
Paint cabinets moss green in two coats and let dry completely. Apply patina glaze with a small brush around corners and lightly around raised trim; wipe back so it stays concentrated at edges. Seal with a clear topcoat that protects from cleaning. Hardware: matte black pulls are $20-60. Budget: paint $70-160 and patina supplies $15-30.
Pro tipUse a small amount of glaze on one door first, then compare under your room lighting.
One warningDon’t cover flat panels heavily — patina should live on edges and corners.
12. Green cabinets with white-painted interior shelves
This look is about making the whole cabinet feel crisp, even on a budget. Paint the exterior doors green, then paint the inside shelves white (or off-white) so the interior reads clean and bright. It also tricks the eye into thinking your space is larger, which matters in small kitchens and bedroom kitchenette corners. If you have glass-front doors, the white interior makes green look more saturated. Pair with simple black hardware so the interior brightness stays the focus.
Remove doors or at least mask shelf edges, then paint the cabinet exterior green in two coats. Paint the inside shelves white after sanding and cleaning; one or two coats depending on coverage. Let everything dry thoroughly before reinstalling doors so you don’t scuff fresh paint. If you have glass fronts, clean and tape edges before painting around frames. Budget: paint supplies $70-180 depending on how much interior you cover; hardware $20-70.
Use a small foam brush for shelf corners so the white stays smooth.
Don’t leave interiors raw wood or mismatched — it makes the green feel accidental.
13. Green cabinets with peel-and-stick marble stripe countertop upgrade
If your countertop is the budget weak spot, fix it with contact paper and let green cabinets do the rest. Pick a white marble stripe pattern so it looks “architectural” instead of flat. Then choose a green cabinet shade that doesn’t compete with the countertop — sage or soft olive is the easiest match. This setup looks good because green gives you color, and the marble stripe gives you movement. It’s an easy win for renters and bedroom kitchenette corners where you can’t replace real counters.
Paint or vinyl-wrap cabinet doors in sage or soft olive, then apply marble stripe contact paper to the countertop. Cut contact paper slightly larger than the surface, press from the center outward, and use a plastic squeegee to prevent bubbles. Trim tight along edges and seal gaps with clear caulk where water splashes. Install new pulls in matte black or brushed nickel for contrast. Budget: contact paper $25-60 and paint/vinyl $60-180.
Pro tipMatch the stripe direction across the counter run — straight lines look intentional even with contact paper.
One warningDon’t choose a busy marble pattern with a busy green — it turns chaotic fast.
14. Green base cabinets with open upper shelves in natural wood contact
This is a budget way to get contrast and storage without replacing everything. Paint the base cabinets green and leave the uppers open shelves. Then cover the shelf boards with natural wood-look contact so the “wood” look is consistent without real lumber. Open shelving makes a kitchen feel lighter, and the green base anchors the color. In a bedroom, this reads like a built-in display wall for books, mugs, or folded linens. The key is keeping the shelf wood tone warm and the green undertone steady.
Paint only the base cabinet doors and drawer fronts green in two coats. For open shelves, clean shelf boards and apply wood-look contact paper, pressing edges tight and trimming neatly. Install shelves with a level and use screws into studs or proper anchors. Hardware for base cabinets should match the metal you use on any decor items. Budget: paint $60-160, contact paper $15-40, screws/anchors $10-25.
Pro tipKeep shelf brackets minimal and black so the green and wood do the talking.
One warningDon’t mix cool gray wood-look contact with warm olive green.
15. Green cabinets with brass line pulls for a clean, modern look
Slim line pulls are an easy “designer” trick because they draw the eye along the cabinet lines. Pair them with a green paint color that’s not too dark — sage, olive, or medium forest — so the brass looks intentional instead of loud. This look works well on both shaker and flat-panel doors because the hardware shape does the styling. In bedrooms, it’s especially good for a vanity drawer run where you want a sleek, quiet vibe. Keep everything else simple: white walls and one countertop color.
Paint doors in your chosen green and use a satin finish for a smooth look. Mark drawer and door centers, then install line pulls so spacing is consistent across the run. Use a template or measure the pull-to-pull distance carefully; budget line pulls are usually $20-60 for a set. If you want to save more, use existing holes by choosing pulls that match your current spacing. Budget: paint $60-160, pulls $20-60.
Pro tipMeasure from the same reference edge on every door so the pulls line up visually.
One warningDon’t pick chunky knobs with slim doors — the scale looks off.
16. Color-matched green hardware and hinges with spray paint
Matching hardware to the cabinet color makes the cabinets look smoother and more built-in. It also hides small imperfections around screw holes, which is a sneaky budget win. You don’t need new hardware if your current pulls are metal — you can spray-paint them in a matching green tone. This works best when your cabinet green is medium or light, because very dark greens can make hardware matching look flat. In a bedroom, matched hardware makes built-ins feel calmer and less busy.
Remove pulls and hinges if possible, then clean them with degreaser and sand lightly for adhesion. Spray with a metal primer, then apply green spray paint in thin coats; let cure between coats. Reinstall after the cabinets are fully painted and dry so you don’t scuff fresh cabinet paint. Budget: spray paint and primer $15-35, plus degreaser/sandpaper $5-15.
Pro tipUse satin or semi-matte spray finish so the hardware doesn’t look like plastic.
One warningDon’t paint over oily metal — it will chip around the edges.
17. Chalky green matte cabinets with wax topcoat for easy touch-ups
Matte chalk-style paint gives you that flat, trendy look without needing a high-end lacquer system. The catch is durability, so you seal with wax or a compatible topcoat that lets you touch up later. For budget green kitchen cabinets on a budget, matte can look intentional if you keep the finish consistent and don’t over-brush. Choose a muted green like sage or moss so the chalky texture reads stylish rather than worn. This is a good choice for bedroom storage cabinets where you’re not scrubbing grease daily.
Sand lightly, clean well, then apply chalk-style green paint in two coats. Let it dry fully, then buff with a wax topcoat using a soft cloth or wax brush following the product directions. For hardware, use simple matte black or natural wood knobs to avoid shiny mismatches. Budget: chalk paint $25-60 per quart depending on brand and coverage, plus wax $15-30.
Do a small test patch on the least-visible door first and check it after 24 hours.
Don’t use chalky matte on doors that get heavy water splashes without a proper seal.
18. Green cabinets with white beadboard panels in the center
Beadboard centers add texture that makes green look more expensive without adding cost. Paint the outer door frame green, then use inexpensive beadboard paneling for the center section and paint it white. The contrast gives you depth and hides small imperfections because beadboard has built-in texture. This look is great for kitchens that need warmth and for bedroom built-ins that need visual interest. Pair with simple black knobs so the texture stays the star.
Measure the center panel opening on each door and cut beadboard to fit; use wood glue and small brads or screws from the back. Sand edges, fill any gaps, then prime and paint: green on the frame and white on the beadboard. Two coats on green and one to two on white usually cover. Install black knobs centered on the door panel and aligned across doors. Budget: beadboard offcuts $10-40, glue/brads $5-15, paint $60-180.
Pro tipKeep the beadboard paint satin so it wipes clean better than flat paint.
One warningDon’t use glossy white beadboard — it reflects harsh light and fights the matte green.